| LAVERDAMANIA |
GOLD VALVE EMULATORS (thanks to Chris Pritt and Doug Home)
| Over the next few pages I'm going to explain how Laverda Marzzochi or Ceriani forks work, or to put it more succinctly, why they don't work very well. |
| Fork Basics: As you know, the forks contain a certain amount of oil who's purpose is to control the rate, or speed the forks compress and rebound, ie: go up and return to their normal level. As the forks are compressed the oil is forced through one set of holes - orifices to be precise. The size and number of holes coupled with the viscosity of the oil determine how quickly the oil will flow from one chamber (A) to another (B). When the forks extend themselves, the oil has to return from chamber B to chamber A via another set of holes. This gives us our compression and rebound damping. The main fault with standard forks is that the only means of adjusting the compression damping is by changing the viscosity of the oil. This will also affect the rebound damping since the same oil must return to its original chamber. The upshot of all this is: change one and affect the other. It's not possible to simply change the compression damping independently of the rebound damping and vice versa. Unless of course you want to get involved in drilling the existing holes. Another factor also needs to be taken into account at this point and that is the need for low and high speed compression damping, and NO, I'm not talking about high speed as in kph. or mph., but the speed at which the forks compress. Small bumps equate to low speed compression damping whereas pot holes, ridges and oh shit! handfulls of brake mean high speed compression damping of the front forks. The standard fork set up cannot differentiate between low and high speed compression as there is only one set control holes. That's why on one hand your forks may feel mushy on smooth roads and in normal braking situations and yet feel quite harsh when encountering potholes and ridges in the road. What is obviously needed here is a damping system that can differentiate between low and high speed damping> This is what "Gold Valve Emulators" do. Not only do they differentiate between low and high speed bumps but you can adjust them to give you the type of ride that you want, or, to suit the type of application you require, ie, soft for cruising or firm for track days and fun motorcycling. Oh yes, did I forget to mention that these adjustments do not affect the rebound damping. Sounds too good to be true doesn't it? But they work and work bloody well. Just how they work we'll cover later in this article. Lets first see how the standard forks work. | 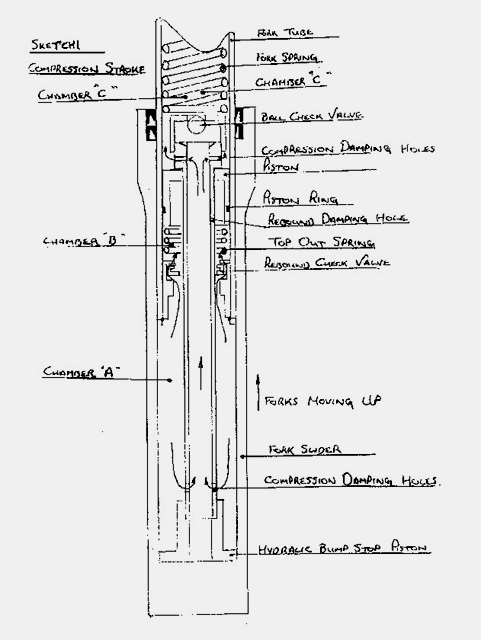 |
 |
When a bump is encountered the fork slider rises up the fork tube; at this moment the following happens (Sketch 1): 1. The ball check valve opens, 2. Rebound check valve opens, 3. The
oil in chamber A flows a) into chamber B and b) through the compression damping
holes at the bottom of the damper rod and exits through the top of the damper
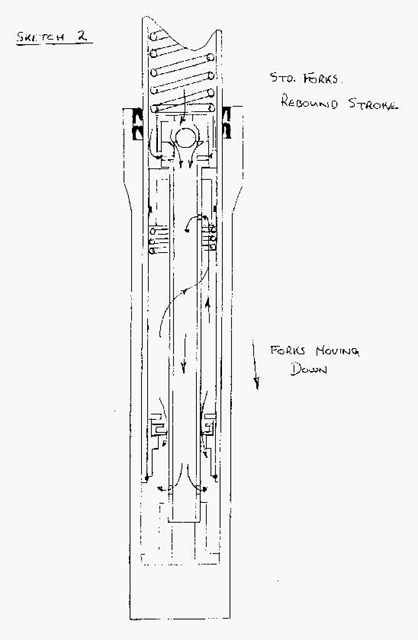
rod through two more compression damping holes into chamber C. When the forks extend: 1. The ball check valve closes, 2.
the rebound check valve closes stopping the free flow of oil through the valve,
and forcing it through the small rebound hole in the damper rod. |
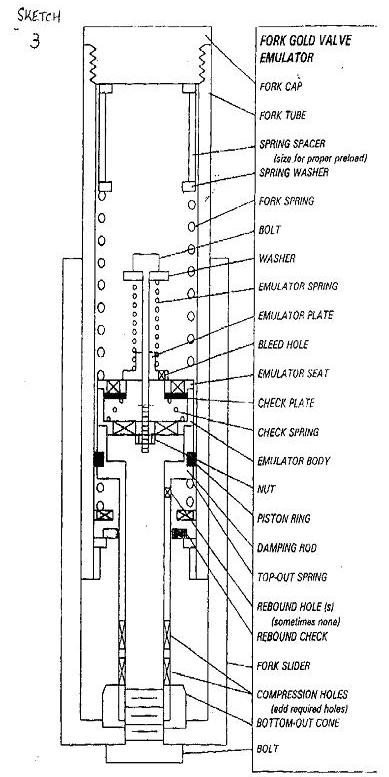
| What does the emulator do: To fit the emulator the ball check valve at the top of the damper rod is removed and six 8mm holes are drilled at the bottom of the damper rod in place of the compression damping holes. By doing these mods we completely nullify the standard compression damping system. The six 8mm holes flow sufficient oil to prevent any compression damping taking place, leaving the oil free to travel to the emulator where the real work is done. You'll notice that nothing has been done to affect the rebound damping. Chamber B remains the same, so that our rebound damping stays constant. With the emulators fitted the viscosity of the oil affects only the rebound damping so adjustment of the rebound damping is made by changing the oil. ie: thicker oil slower rebound, thinner oil quicker rebound. The size of the holes in the damper rod and the port size of the emulator for the sake of this discussion are not affected by the grade of oil.
|  |
 |
Low speed compression damping (Sketch 4)
Here we see that the oil is free to leave chamber A, flow through the damper rod and exit the emulator though a small hole in the emulator plate. This small hole gives us our low speed compression damping. The theory being low speed movement only requires a small hole to control the small amount of oil passing through. |
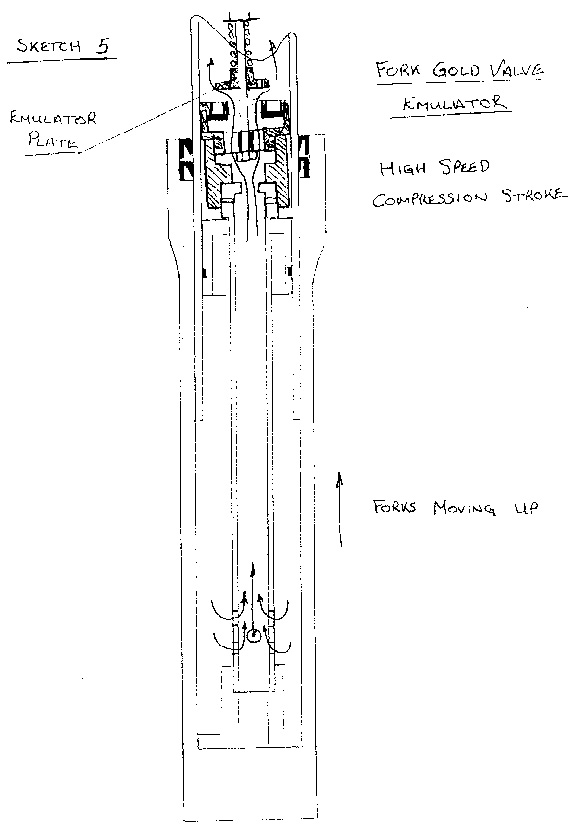 |
High speed compression damping (Sketch 5)
We've hit a humungus pot hole and the forks are sliding up the stanchions fast. The speed and pressure of the oil has lifted the emulator plate off of it's seat opening up larger ports for the oil to flow through quickly. The faster the forks move the more the emulator plate lifts off its seat thus flowing a greater amount of oil. You'll notice that the spring on top of the emulator plate can be adjusted to increase or decrease the pressure on the plate. This is how we adjust the emulator. |
 |
Rebound compression damping (Sketch 6)
With the forks now extending back to their normal position the check plate in the emulator has fully opened allowing the oil in chamber C to return unrestricted to chamber A. The rebound compression damping is controlled by the small rebound damping hole, the seepage of oil past the rebound check valve and the weight of the oil. We now have fully adjustable front forks. The adjustment of the emulator is quite infinite. One turn of the adjusting screw will give a plush ride. Three turns is quite firm. The choice is yours. As I mentioned before, the rebound is adjusted by changing the viscosity of the oil in the forks. The emulators can be quickly removed from the forks by undoing the fork cap, pulling out the spring and then hooking out the emulator with a bent piece of wire |
| Fitting the Emulators: Parts required: 2 off FEGV 3801S RaceTech Gold Valve cartridge emulators. 2 off Mounting Spigots (Marzzocchi forks only) - see below 2 off Emulator spacers (Marzzocchi forks only) - see
below. Where to get the Emulators: RaceTech's webpage http://www.racetech.com/index.asp will lead to a dialog box with local distributor's contact details in your area or contact Ash Vaughan at distsales@racetech.com and he'll point you the right way. Tools required:
Long 8mm Allen key socket. |
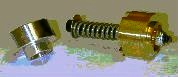
| Mounting spigot |
Spacer |
 |
 |
| Dismantling: Remove the forks from the bike and take the springs and the damping rod bolts out, turn the fork upside down and the damping rods will fall out. An air impact and a long Allen key socket helps a lot with stubborn damping rod bolts. Flush out all the rubbish and clean them carefully. While you have the forks open - check the bores, floating check valves, sliders and damper rods for wear. Replace as required and put in new seals. |
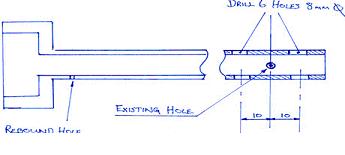 |
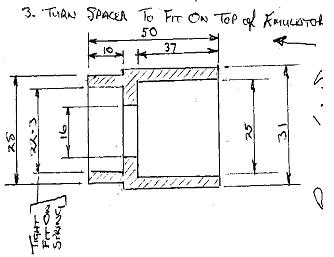
To fit emulators in Marzocchi forks: You'll
have to machine up the two pieces in the sketch above and drill out the damper
rod like this. |
| Remove the
ball check valve and fit the mounting spigot over the top of the damper rod to
seal off the two compression damping holes and locate the emulator. Checks:
Check the emulator fits into the fork tube - if not; you have the wrong model.
Assembly:
Drop the emulator and damper rod down the tube. Tuning: To adjust the emulator, remove the springs and using a thin welding rod with 6mm of both ends bent over 90 degrees into a hook - fish them out. Adjustment of the emulator is by screwing down the nut and increasing the valve spring preload. This will make the fork stiffer. |
| Tuning
variables | Standard |
Optional |
Primary Effect |
| Oil
Viscosity | 15w |
5w or 10w |
Sets rebound. |
| Valve
Spring Preload | 4
Turns (Racing) | 0
to 7 Turns | Low
and Mid Speed |
| Valve
Spring Rate | 64
Ibs/in | 26,
101 Ibs/in | Mid
and High Speed |
|
Bleed Holes |
1 1/8" Hole |
2 1/8"Holes |
Low Speed |
See
here: http://perso.wanadoo.fr/laverdamania/suspensiongb.htm
for more tuning info.
Benefits:
" They will reduce the front-end dive especially when braking.
" They will
give feed back - and so give you confidence to go faster mid corner.
" They
will stop, if adjusted properly, weird handling wobbles and bobbles.